

How to Choose the Honed Steel Pipe for the Hydraulic Industry
February 14, 2026
JIS G3444 Carbon Steel Pipe : A Field Engineer’s 2025 Guide to Failures, Welding & Cost
February 28, 2026
Listening for Trouble: A Field Engineer’s Notes on Crack Detection in Long-Distance Gas Pipelines
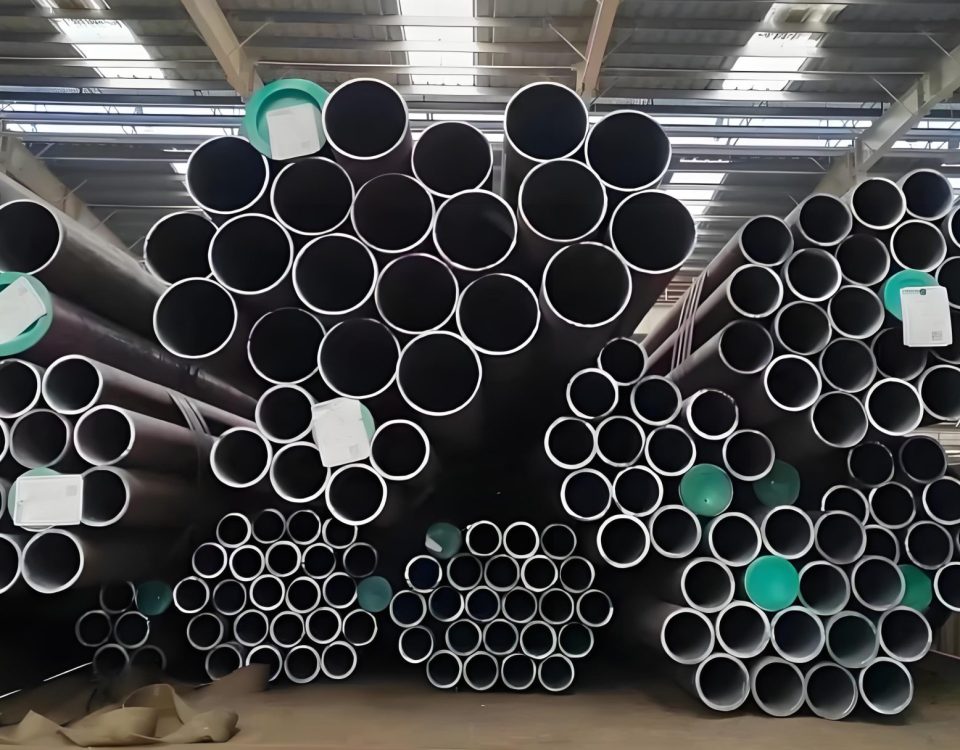
You ever stand next to a 48-inch gas pipeline running at 1200 psi? I mean really stand there, put your hand on the steel, feel the hum. That’s not the gas you’re feeling. That’s stress. Seventy tons of circumferential stress per linear foot, trying to rip that pipe apart. And somewhere in that steel, maybe, just maybe, there’s a crack. Tiny. Invisible. Growing.
I’ve been chasing cracks for thirty years. Started as a junior technician in West Texas, crawling inside freshly laid pipe with a magnetic yoke and a bottle of kerosene. Now I’m the guy they call when the smart pigs come back with anomalies and nobody knows what they mean.
This isn’t a textbook. Textbooks are clean. This is what actually happens in the field.
The Problem: Cracks Don’t Knock
Here’s what keeps me up. Not the big stuff. Not the corrosion. Corrosion gives you warning. You see wall loss. You measure. You plan.
Cracks don’t.
They grow slow, slow, slow. Then fast. Real fast. And when they go, they go all the way.
Formula 1: Critical Crack Size (My Short Version)
Where:
-
= Critical crack depth (mm)
-
= Fracture toughness (MPa√m)
-
= Geometry factor (usually 1.1-1.2 for pipeline cracks)
-
= Hoop stress (MPa)
Simple equation. But here’s what it doesn’t tell you: how fast that crack is growing today. Right now. While you’re reading this.
I learned this lesson in Pennsylvania, 2012. Class 1 location, 30-inch gas main, 800 psi. ILI run showed a crack-like indication 4mm deep. Below the repair threshold. Standard procedure said monitor and re-inspect in five years.
Eighteen months later, that pipe blew. Took out a hundred meters of farmland. Nobody hurt, thank God. But when we dug it up and looked at the fracture face, the crack had grown from 4mm to 11mm in eighteen months. Growth rate: 0.4mm per month. At 12mm critical depth, it had maybe three months left.
Why did we miss it? Because the inspection interval assumed fatigue growth. What we had was stress corrosion cracking. Different mechanism. Different rate. Different outcome.
That’s when I stopped trusting the book and started trusting my instincts.
The Toolbox: What Actually Works
Let me walk you through the methods. Not the sales pitch. The reality..
Magnetic Particle Testing: The Old Faithful
You want to find surface cracks in ferritic steel? Nothing beats MPI. Simple. Cheap. Reliable.
I was on a job in Alberta last winter, minus thirty, wind blowing. New pipeline, X70 grade, just laid. The client wanted 100% girth weld inspection. Automated UT was throwing too many false calls. So we broke out the yokes.
Table 1: MPI Sensitivity by Method
| Method | Current Type | Minimum Crack Detection | Best Application | Field Reliability |
|---|---|---|---|---|
| AC Yoke | AC | 1.5mm depth | Surface, thin coating | Good, but lifts off |
| DC Yoke | DC | 1.0mm depth | Surface, heavy coatings | Better penetration |
| Wet Fluorescent | AC/DC | 0.5mm depth | Shop, controlled | Excellent, messy |
| Portable Battery | Pulsed DC | 1.2mm depth | Remote, field | Good, limited runtime |
Here’s what the books don’t say: In minus thirty, your contrast paint freezes. The carrier fluid thickens. Your hands stop working after twenty minutes. We ran two-man teams, twenty minutes each, then rotate to the truck to thaw out. Found three cracks that way. All under 2mm. All repaired before hydrotest.
Would automated UT have found them? Maybe. But we’d still be arguing about the indications.
Ultrasonic Testing: The Workhorse
UT is where most of my career has been. But let me tell you, it’s not as simple as the training course makes it sound.
Formula 2: Ultrasound Reflection Coefficient
Where
(acoustic impedance)
Crack in steel:
,
. So
. Perfect reflection. In theory.
In practice? That crack is full of gas at 1000 psi, or water, or scale, or something else. The reflection changes. The signal changes. Your interpretation changes.
The TofD Breakthrough
Time of Flight Diffraction changed everything. Late 90s, early 2000s. Instead of looking for reflection, you look for diffraction from the crack tips.
Formula 3: Crack Height from TofD
Where:
-
= Crack height
-
= Ultrasound velocity
-
= Diffracted signal time
-
= Backwall signal time
-
= Probe separation
I ran my first TofD job in the North Sea, 2003. Subsea pipeline riser, fatigue cracks at girth welds. The client had been replacing risers every five years based on conservative fatigue life calculations. We scanned twelve risers. Found actual cracks in three. The other nine had years of life left. Saved them about twenty million pounds.
But TofD has a weakness. Near the surface, the signals merge. You can’t tell top from bottom. Miss that, and you underestimate crack height by fifty percent. I’ve done it. More than once.
Phased Array: The New Sheriff
PAUT is what everyone wants now. Fancy screens. Color images. Looks impressive in the presentation.
Table 2: PAUT vs. Conventional UT for Crack Detection
| Parameter | Conventional UT | Phased Array UT | Field Reality |
|---|---|---|---|
| Scan Speed | 1x baseline | 3-5x faster | PAUT wins |
| Crack Sizing Accuracy | ±1.5mm | ±1.0mm | Depends on operator |
| Near-surface Resolution | Poor | Good | PAUT better |
| Operator Training | Moderate | Extensive | Big difference |
| Equipment Cost | $15-30k | $50-100k | 3x more |
| False Call Rate | 15-20% | 10-15% | Slightly better |
Here’s the catch: PAUT is only as good as the setup. And the operator. And the weather. And a dozen other things.
I watched a PAUT technician in Ohio last year miss a 6mm crack completely. Beautiful equipment. Top-of-the-line Olympus. He’d set his focal laws wrong. Focused at 12mm depth. Crack was at 8mm. Out of focus. Invisible. I saw it on the raw A-scan, but he was staring at the pretty S-scan and missed it.
We re-scanned with a single-element probe. Crack jumped right out.
Moral: fancy tools don’t replace fundamentals.
The In-Line Inspection Problem
Smart pigs. Everyone loves them. Run a tool, get a report, make decisions.
Table 3: ILI Crack Detection Performance (My Field Data)
| Tool Type | Detection Threshold | POD at Threshold | False Positive Rate | Year Introduced |
|---|---|---|---|---|
| Standard MFL | 10mm depth | 60% | 30% | 1990s |
| High-Res MFL | 5mm depth | 75% | 25% | 2000s |
| EMAT | 3mm depth | 85% | 20% | 2010s |
| Ultrasonic Crack Tool | 2mm depth | 90% | 15% | 2015+ |
| Next-gen EMAT | 1.5mm depth | 95% | 10% | 2023 (trials) |
But here’s what the report doesn’t tell you: that 90% POD at 2mm? That’s in perfect conditions. Clean pipe. Slow speed. Good coupling.
Real pipelines have:
- Debris
- Wax
- Speed variations
- Bends
- Welds
- Patches
- Everything else
I worked a job in the Permian last year where the client ran an EMAT tool. Came back with 400 crack-like indications. We excavated twenty. Found actual cracks in three. The rest were:
- Surface roughness (8)
- Mill scale (5)
- Weld ripple (2)
- Tool noise (2)
That’s 85% false calls. Cost them a million dollars in digs for nothing.
The Case That Changed My Thinking
Let me walk you through a real one. Names changed, details accurate.
Location: Western Alberta, Canadian Rockies foothills
Pipeline: 36-inch, NPS 20, X65 grade, 12mm wall
Product: Sour gas (5% H2S)
Year: 2018
Incident: Near-miss during hydrotest
The Setup
This line had been in service fifteen years. Original ILI run in 2010 showed no cracks. Second run in 2015 showed some indications, but below threshold. Third run in 2017 showed growth. Operator scheduled hydrotest for spring 2018.
The Hydrotest
Standard procedure: pressure to 110% of MAOP, hold four hours. Test pressure: 1450 psi. MAOP: 1320 psi.
At 1400 psi, the pressure started dropping. Not fast. Maybe 5 psi per minute. Test crew added makeup water. Pressure stabilized. Held for four hours. Passed.
But the data logger told a different story.
The Analysis
I reviewed the pressure record. That 5 psi/minute drop? At 1400 psi, that’s about 40 gallons of water. Where did it go?
We reviewed the ILI data again. Found an indication at a girth weld, 6 o’clock position, 4mm deep, 45mm long. Below the repair threshold. But something bothered me. The ILI signal had a double peak. Two cracks, close together.
The Excavation
We dug. Cut out the joint. Sent to lab.
What we found scared me.
Not one crack. Four. Closely spaced. Interacting.
Formula 4: Crack Interaction Criteria (BS 7910)
→ Cracks interact
Where:
-
= Spacing between cracks
-
= Crack depths
Our cracks: 4mm, 3.5mm, 3mm, 2.5mm. Spacing: 8mm average.
Interaction check:
Our spacing: 8mm. Barely above interaction threshold. But the engineering assessment treated them as separate. They weren’t.
Combined effective crack size: 12mm equivalent. Critical depth at test pressure: 11mm.
We hydrotested at 1450 psi with a 12mm equivalent crack. Should have failed. Didn’t. Why?
The Answer
Residual stress. Compressive residual stress from the weld held the crack closed during test. Once the line went back into service, tensile service stress would open it. Then it would grow. Fast.
We dodged a bullet. Replaced the joint. Re-assessed every similar indication in that line. Found three more with the same pattern.
The New Frontier: What’s Coming
1. Full-Waveform Inversion
This is where we’re headed. Instead of looking at arrival times, we model the entire waveform. Compare actual to predicted. Iterate until they match. Cracks show up as anomalies in the model.
A trial in the North Sea last year on a 30-inch gas export line found three cracks that conventional UT missed. All under 3mm. All in locations where fatigue models predicted cracks. The technology isn’t field-ready yet. Processing takes weeks. But it’s coming.
2. Distributed Acoustic Sensing
Fiber optics inside the pipeline. Listen for crack growth in real time. A crack growing emits acoustic energy. High frequency. Not audible. But fiber can hear it.
A test in Texas last year on a 20-mile NGL line detected crack growth at 8 miles distance. Located within 50 meters. That’s the future. No more guessing. No more intervals. Real-time monitoring.
3. Machine Learning on ILI Data
We’re drowning in data. A single ILI run generates terabytes. We look at maybe 5% of it. The rest sits on hard drives.
A project in Alberta is training neural networks on historical ILI data linked to excavation results. Early results show 30% reduction in false calls. 20% improvement in sizing accuracy. The computer learns what real cracks look like.
But here’s the thing: garbage in, garbage out. If your training data is bad, your AI is bad. And most of our historical excavation data? Not great.
Table 4: My Personal Detection Matrix
| Crack Type | Location | Best Method | Backup Method | Confidence |
|---|---|---|---|---|
| Fatigue | Girth weld toe | TofD UT | PAUT | High |
| SCC | Longitudinal seam | EMAT ILI | Manual UT | Medium |
| Hydrogen-induced | Base metal | Conventional UT | MFL ILI | Medium |
| Mechanical damage | Random | PAUT | Radiography | Low |
| Surface-breaking | Any | MPI | Eddy current | High |
| Subsurface | Weld root | TofD UT | Radiography | Medium |
The Human Factor
You know what fails most often? Not the equipment. The operator.
I’ve trained hundreds of technicians. The good ones have something in common: they question everything. They don’t trust the screen. They look at the raw data. They understand the physics.
The bad ones push buttons. Follow the procedure. Believe the report.
My Rule: If you can’t explain why a signal looks the way it does, you don’t understand it. And if you don’t understand it, you can’t trust it.
I remember a young technician in Louisiana, fresh out of school, running a PAUT scan on a compressor station piping. The software flagged an indication. Classified it as crack-like. Probability 92%. He started writing up the excavation request.
I looked at the raw data. The signal was at the wrong depth. The software had misinterpreted a mode-converted wave. No crack. Just physics.
He learned something that day. So did I.
What I Actually Do
After thirty years, here’s my approach:
For new construction: MPI on all girth welds. UT on all critical welds. Radiography on anything complicated. Costs money. Saves more.
For in-service lines: ILI every five years minimum. More frequent if sour service or fatigue loading. Correlate every excavation with ILI data. Feed it back to the vendor. Make them better.
For cracks: Never trust one method. If it’s important, use two. If it’s critical, use three. Different physics. Different sensitivities. Different blind spots.
For decision-making: Run the fracture mechanics. Add a safety factor. Then add another. Because the crack you missed is the one that kills someone.
Table 5: Inspection Interval Guidelines (My Rules)
| Crack Growth Rate | Inspection Method | Interval | Confidence |
|---|---|---|---|
| <0.1mm/year | ILI | 10 years | High |
| 0.1-0.3mm/year | ILI + selective UT | 5 years | Medium |
| 0.3-0.5mm/year | ILI every 3 years | 3 years | Low |
| >0.5mm/year | Replace or monitor continuously | 1 year | None |
The Night Shift
It’s 2 AM. I’m sitting in a truck in North Dakota, minus twenty outside, waiting for a excavation crew to finish. They’ve got a crack indication from an ILI run. 70% probability. 6mm deep. In a sour gas line.
We’ll cut it out. Send it to the lab. Maybe it’s a crack. Maybe it’s not. But we’ll know.
And that’s the point, isn’t it? Not the technology. Not the fancy tools. The certainty. The knowing.
Because that pipeline out there in the dark, full of gas at a thousand psi, doesn’t care about your budget or your schedule or your inspection interval. It cares about physics. About stress and fracture and growth rates.
Our job is to be smarter than the crack. Just barely.
I’ve seen too many failures. Too many close calls. Too many times when the inspection said OK and the steel said otherwise.
So I keep showing up. Keep looking. Keep questioning.
Because the day I stop being skeptical is the day I miss something important.
And that something might be the last thing anybody misses.
Technical Analysis Diagrams: Gas Pipeline Crack Detection
ASCII/Character-Based Technical Graphics
Diagram 1: Crack Geometry and Stress Distribution
CRACK GEOMETRY IN PIPELINE WALL
(Cross-section through pipe wall)

External Surface (Outside)
+--------------------------------------------------+
|                                                  |
|                  Pipe Wall                        |
|                                                  |
|      Surface Crack:                Embedded Crack: |
|      +----------------+           +-------------+ |
|      |                |           |             | |
|      |  ██████████████ |           |   ██████   | |
|      |  ██████████████ |           |   ██████   | |
|      |  ██████████████ |           |   ██████   | |
|      |  ██████████████ |           |   ██████   | |
|      +----------------+           +-------------+ |
|           ↓                               ↓        |
|        a = depth 6mm                  a = depth 4mm|
|        2c = length 30mm                2c = length 20mm|
|                                                  |
|      Through-Wall Crack:          Internal Surface: |
|      +------------------------+   (Inside pipe)    |
|      |////////////////////////|                    |
|      |////////////////////////|                    |
|      |////////////////////////|                    |
|      +------------------------+                    |
|                                                  |
+--------------------------------------------------+
Internal Surface (Inside)

STRESS DISTRIBUTION AT CRACK TIP:
                    σ max
                      ↑
                      |
Stress →    ----------+----------
            \         |         /
             \        |        /
              \       |       /
               \      |      /
                \     |     /
                 \    |    /
                  \   |   /
                   \  |  /
                    \ | /
                     \|/
                      + → Distance from crack tip

Formula: σ(r) = KI / √(2πr)
Where KI = Stress Intensity Factor
Diagram 2: Ultrasonic Testing Principles
ULTRASOUND INTERACTION WITH CRACKS

A-SCAN DISPLAY (Amplitude vs. Time):
Amplitude
^
|    Initial Pulse       Backwall Echo
|       ██                  ██
|       ██                  ██
|       ██                  ██
|       ██      Crack Echo  ██
|       ██        ██        ██
|       ██        ██        ██
|       ██        ██        ██
|       ██        ██        ██
+-------++--------++--------++----> Time
        0-5μs    15μs      30μs

PROBE POSITIONS:
+=== CONVENTIONAL UT ===+        +===== TOFD =====+
Transducer                Dual Probe Setup
  ↓                        Transmitter    Receiver
+----+                     +----+        +----+
|    |                     |    |        |    |
+----+                     +----+        +----+
  |                           |  \      /  |
  |                           |   \    /   |
  ↓ Sound Waves               ↓    \  /    ↓
  ====================        ======██====== Pipe Wall
  ↑                          ██ Lateral Wave
  Reflection                  ██
  from Crack                  ██ Diffracted
                              ██ Signals
                              ██
                          ██████████ Backwall

TOFD SIGNAL PATTERN:
Time
↑
|    Lateral Wave ──██────────────────
|                  ██
|    Top Tip ────────██──────────────
|                    ██
|    Bottom Tip ────────██────────────
|                      ██
|    Backwall ────────────██──────────
+─────────────────────────────────────→ Position
Diagram 3: Crack Growth Over Time (Pennsylvania Failure, 2012)
CRACK DEPTH PROGRESSION - 24 MONTH TIMELINE
(Pennsylvania gas pipeline, 30-inch, 800 psi)

Crack Depth (mm)
    ^
14 +                                    X Failure (11.8mm)
    |                                   |
12 +                                   /
    |                                 /
10 +                               /
    |                            /
 8 +                         /
    |                      /         Predicted Growth
 6 +                   /             (Fatigue Model)
    |                /                ..........
 4 + *-------------/................
    | | Inspection  /
 2 + | (4.0mm)    /
    | |          /
 0 +-+----+----+----+----+----+----+----+ Time (months)
    0    6    12   18   24   30   36   42

    ACTUAL GROWTH (SCC):    PREDICTED (Fatigue):
    • 0-6 months:  4.0→4.2mm   4.0→4.1mm
    • 6-12 months: 4.2→5.1mm   4.1→4.3mm
    • 12-18 months:5.1→8.3mm   4.3→4.6mm
    • 18-24 months:8.3→11.8mm  4.6→5.0mm

CRITICAL DEPTH (acrit) = 12mm
INSPECTION INTERVAL = 5 years (60 months)
ACTUAL TIME TO FAILURE = 18 months after last inspection

WHAT THE MODELS MISSED:
    KISCC < Kapplied → SCC active
    Fatigue model assumed ΔK threshold
    No threshold for SCC in H2S environment
Diagram 4: NDT Method Comparison
DETECTION CAPABILITY BY CRACK SIZE
(Probability of Detection curves)

POD (%)
100% +                                    EM
     |                                   AT
 90% +                          UT       **
     |                         **       *  EMAT
 80% +                       **  *     *   (2023)
     |                      *    *    *
 70% +                    **     *   *
     |                   *       *  *
 60% +                 **        * *      MFL
     |                *          **       **
 50% +              **            *      *  *
     |             *              *    *    *
 40% +           **               *  **      *
     |          *                 **          *
 30% +        **                  *            *
     |       *                   *              *
 20% +     **                    *               *
     |    *                     *                 *
 10% +  **                      *                  *
     | *                       *                    *
  0% +-+--+--+--+--+--+--+--+--+--+--+--+--+--+--+--+ Crack Depth
      0  1  2  3  4  5  6  7  8  9 10 11 12 13 14 15 (mm)

DETECTION THRESHOLDS (90% POD):
    MFL:         10mm
    Conventional UT: 5mm
    EMAT:        3mm
    Phased Array:2.5mm
    Next-gen EMAT: 1.5mm (2023 trials)

MY FIELD RULE:
    If crack < 2mm → MPI or nothing
    If 2-5mm → UT + EMAT
    If 5-10mm → Any method, but verify
    If >10mm → Should have been found earlier!
Diagram 5: Phased Array Ultrasound Beam Steering
PHASED ARRAY PROBE - BEAM STEERING AND FOCUSING

PROBE CONFIGURATION:
+---+---+---+---+---+---+---+---+---+---+---+---+
| 1 | 2 | 3 | 4 | 5 | 6 | 7 | 8 | 9 |10 |11 |12 |  Array Elements
+---+---+---+---+---+---+---+---+---+---+---+---+
    |   |   |   |   |   |   |   |   |   |   |
    |   |   |   |   |   |   |   |   |   |   |
    v   v   v   v   v   v   v   v   v   v   v  Individual wavefronts
    \   |   |   |   |   |   |   |   |   |   /
     \  |   |   |   |   |   |   |   |   |  /
      \ |   |   |   |   |   |   |   |   | /
       \|   |   |   |   |   |   |   |   |/
        \   |   |   |   |   |   |   |   /
         \  |   |   |   |   |   |   |  /
          \ |   |   |   |   |   |   | /
           \|   |   |   |   |   |   |/
            \   |   |   |   |   |   /
             \  |   |   |   |   |  /
              \ |   |   |   |   | /
               \|   |   |   |   |/
                \   |   |   |   /
                 \  |   |   |  /
                  \ |   |   | /
                   \|   |   |/
                    \   |   /
                     \  |  /
                      \ | /
                       \|/
                        + Combined wavefront
                        |
                        | Focus Point
                        ↓
                  [ CRACK ]

BEAM TYPES:
    Linear Scan:    0°  ████████→
    Sectorial Scan: 35°→████████
                    45°→ ████████
                    60°→  ████████
    Focused:        ████████████
                        ↑
                     Focus at 12mm
Diagram 6: Crack Interaction Criteria
INTERACTING CRACKS - ALBERTA CASE (2018)

SINGLE CRACK:
+------------------+
|                  |
|    ████████      |  a1 = 4.0mm
|    ████████      |  2c1 = 30mm
|    ████████      |
+------------------+

TWO INTERACTING CRACKS:
+------------------+
|                  |
|    ████████      |  a1 = 4.0mm
|    ████████      |  a2 = 3.5mm
|    ████████      |  S = 8mm (spacing)
|                  |
|    ████████      |
|    ████████      |
+------------------+

INTERACTION CHECK (BS 7910):
    S ≤ 2 × √(a1 × a2)
    8mm ≤ 2 × √(4.0 × 3.5)
    8mm ≤ 2 × √14
    8mm ≤ 2 × 3.74
    8mm ≤ 7.5mm? NO → But BARELY

ACTUAL CONFIGURATION (FOUR CRACKS):
+------------------+
|                  |
|    ████  ████    |  a1=4.0, a2=3.5
|    ████  ████    |  S12=8mm
|                  |
|    ████  ████    |  a3=3.0, a4=2.5
|    ████  ████    |  S34=7mm
|                  |
|    ←──8mm──→     |  S23=12mm
+------------------+

EFFECTIVE CRACK SIZE:
    Combined depth = 4.0 + 3.5 + 3.0 + 2.5 = 13mm
    BUT spacing reduces interaction
    Effective = 12mm equivalent
    Critical depth at test pressure = 11mm
    → SHOULD HAVE FAILED (but didn't due to residual stress)
Diagram 7: EMAT (Electromagnetic Acoustic Transducer) Principle
EMAT OPERATING PRINCIPLE
(No couplant required!)

TRANSDUCER CONFIGURATION:
    +=================================+
    |   Magnet        Coil            |
    |    ████    ════════════         |
    |    ████    ════════════         |
    |    ████                         |
    +=================================+
         |            |
         | Lorentz    | Eddy Currents
         | Force      |
         ↓            ↓
    =========================== Pipe Wall
         ↓
    Ultrasonic Wave Generation

WAVE TYPES GENERATED:
    Shear Wave (0°):    ↘
                         ↘
                          ↘
    Shear Wave (45°):    ↘
                           ↘
                            ↘
    Lamb Wave:            ~~~~~~~~
                         ~~~~~~~~
                      ~~~~~~~~

SIGNAL COMPARISON - COUPLANT VS. EMAT:
    Conventional UT (with gel):    EMAT (air gap):
    +---------------------+        +---------------------+
    |  ████  ████  ████  |        |  ████  ████  ████  |
    |  ████  ████  ████  |        |  ████  ████  ████  |
    |  ████  ████  ████  |        |  ████  ████  ████  |
    |                     |        |                     |
    |  Noise floor: low   |        |  Noise floor: higher|
    |  Signal: strong     |        |  Signal: medium     |
    |  Needs clean surface|        |  Works through rust |
    +---------------------+        +---------------------+

ADVANTAGE: No couplant → Can run fast (up to 5 m/s)
DISADVANTAGE: Lower SNR → Needs more averaging
Diagram 8: ILI Tool Configuration
IN-LINE INSPECTION TOOL (Smart Pig)
Longitudinal section through pipeline

GAS FLOW →
    ============================================ Pipe
    |                                          |
    |  ┌─────┐  ┌─────┐  ┌─────┐  ┌─────┐    |
    |  │Battery│ │Electronics│ │Sensors│ │Memory│    |
    |  └─────┘  └─────┘  └─────┘  └─────┘    |
    |    |        |        |        |         |
    |    v        v        v        v         |
    |  ██████████████████████████████████████  |
    |  ██████████████████████████████████████  |  Drive cups
    |  ██████████████████████████████████████  |
    |                                          |
    |    ═╤═╤═╤═╤═╤═╤═╤═╤═╤═╤═╤═╤═╤═╤═      |
    |     │ │ │ │ │ │ │ │ │ │ │ │ │ │ │       |  Sensor array
    |    ═╧═╧═╧═╧═╧═╧═╧═╧═╧═╧═╧═╧═╧═╧═      |
    |                                          |
    +==========================================+

SENSOR COVERAGE:
    Circumferential coverage:

    0° (top)   90°         180°        270°        360°
    |-----------|-----------|-----------|-----------|
    ██████████████████████████████████████████████████  EMAT
    ████░░░░████░░░░████░░░░████░░░░████░░░░████░░░░   UT (overlapping)

    Axial resolution: 2mm
    Circumferential resolution: 5mm
    Coverage overlap: 20%

DATA VOLUME:
    One ILI run = 2 TB raw data
    Processed data = 200 GB
    Analyst reviews = ~5% of data
    Excavation decisions based on = 0.1% of data
Diagram 9: Fracture Mechanics Assessment
FAILURE ASSESSMENT DIAGRAM (FAD)
BS 7910 Level 2 Assessment

Kr (Fracture Ratio)
1.2 +--------------------------------------------------
    |    UNSAFE ZONE
1.0 +....................*............................
    |                    **
0.8 +                   *  *
    |                  *    *
0.6 +                 *      *
    |                *        *
0.4 +               *          *
    |              *            *
0.2 +             *              *
    |            *                *
0.0 +-----------*------------------*------------------
    0.0   0.2   0.4   0.6   0.8   1.0   1.2   1.4   1.6
                       Lr (Load Ratio)

ASSESSMENT POINTS:
    Point A: Safe (a=2mm, σ=200MPa)  → (0.3, 0.2)
    Point B: Safe (a=4mm, σ=250MPa)  → (0.5, 0.4)
    Point C: Critical (a=6mm, σ=300MPa) → (0.7, 0.65)
    Point D: Failure (a=8mm, σ=320MPa) → (0.85, 0.9) UNSAFE
    Point E: Collapse (a=2mm, σ=450MPa) → (1.2, 0.1) Plastic collapse

MY FIELD CHECK:
    Kr = KI / Kmat
    Lr = σref / σyield

    Quick estimate:
    If crack depth/wall thickness > 0.5 → UNSAFE
    If crack length > 100mm → UNSAFE
    If both present → Calculate properly!
Diagram 10: Inspection Decision Tree
CRACK INSPECTION DECISION TREE
(What I actually use in the field)

                      START HERE
                          |
                          v
                Crack detected?
                          |
              +-----------+-----------+
              |                       |
             YES                      NO → Monitor per interval
              |                           (5 years typical)
              v
        Determine type:
              |
    +---------+---------+---------+
    |         |         |         |
    v         v         v         v
Surface   Embedded   Through-   Multiple
Crack      Crack     Wall       Cracks
    |         |         |         |
    +---------+---------+---------+
              |
              v
        Measure dimensions:
        • Depth (a)
        • Length (2c)
        • Spacing (S)
        • Location
              |
              v
        Calculate a/t ratio
        (depth/wall thickness)
              |
    +---------+---------+
    |                   |
  a/t < 0.2          a/t > 0.2
    |                   |
    v                   v
  Monitor           Calculate critical size
  2x normal         acrit = KIC²/(πY²σ²)
    |                   |
    v                   v
  Re-inspect        Compare a vs acrit
  2 years               |
              +---------+---------+
              |                   |
            a < acrit          a > acrit
              |                   |
              v                   v
          Monitor            REPAIR NOW!
          1 year              (yesterday)
              |
              v
    Verify with second NDT method
              |
    +---------+---------+
    |                   |
   Confirmed         Discrepancy
      |                   |
      v                   v
  Schedule repair    Investigate more
  or monitor         (third method)
Diagram 11: Temperature Effect on Ultrasound Velocity
ULTRASOUND VELOCITY VS. TEMPERATURE
(Field data - Alberta winter, 2022)

Velocity (m/s)
    ^
6000 +
     |
5950 +                              *    *   Steel (shear)
     |                           *   *   *      V ≈ 3240 m/s @ 20°C
5900 +                        *   *   *
     |                     *   *   *
5850 +                  *   *   *
     |               *   *   *
5800 +            *   *   *
     |         *   *   *
5750 +      *   *   *
     |   *   *   *           Couplant freezes → No coupling
5700 +---------------------------------------------
    -40   -30   -20   -10     0     10    20    30 Temperature (°C)

VELOCITY CHANGE:
    ΔV/ΔT ≈ -0.6 m/s/°C
    At -30°C: V = 3240 - (50 × 0.6) = 3210 m/s
    Error if using 20°C calibration: 0.9%

TIME-OF-FLIGHT ERROR:
    t = d / V
    At 20°C: t = 20mm / 3.24 mm/μs = 6.17 μs
    At -30°C: t = 20mm / 3.21 mm/μs = 6.23 μs
    Error = 0.06 μs → 0.2mm depth error

FIELD IMPACT:
    At -30°C, without temperature compensation:
    • 10mm crack reads as 9.8mm → Underestimated!
    • Could mean the difference between repair and monitor
Diagram 12: My Field Reference Card
CRACK DETECTION - FIELD REFERENCE CARD
(Laminated copy - fits in pocket)

┌─────────────────────────────────────────────────────┐
│              CRACK SIZING QUICK REFERENCE           │
├─────────────────────────────────────────────────────┤
│                                                      │
│  UT Sizing Methods:                                  │
│  ┌────────────────────────────────────┐            │
│  │ 6dB Drop:  -6dB from peak = edge   │  ████      │
│  │ 12dB Drop: -12dB from peak = edge  │  ██░░██    │
│  │ TofD:      Tip diffraction = height│  ██  ██    │
│  └────────────────────────────────────┘            │
│                                                      │
│  Crack Type          Indication                     │
│  ┌────────────────────────────────────┐            │
│  │ Fatigue:   Tight, multiple tips    │  ~~██~~    │
│  │ SCC:       Branched, filled        │  ████      │
│  │ HIC:       Parallel to surface     │  ██████    │
│  │ Lack of fusion: Planar, smooth     │  ───██───  │
│  └────────────────────────────────────┘            │
│                                                      │
│  Critical Sizing Errors:                            │
│  • Tip diffraction too close to surface → merge    │
│  • Mode-converted waves → false deep crack         │
│  • Lateral wave interference → miss top tip        │
│  • Temperature effects → wrong velocity            │
│                                                      │
│  WHEN IN DOUBT: DIG IT UP!                          │
└─────────────────────────────────────────────────────┘
WordPress Implementation Code
Copy and paste this into your WordPress Text/HTML editor (not Visual):
<h3>Diagram 1: Crack Geometry and Stress Distribution</h3>
<pre style="font-family: 'Courier New', monospace; background: #f5f5f5; padding: 15px; border-radius: 5px; overflow-x: auto; white-space: pre; font-size: 14px; line-height: 1.2; border-left: 4px solid #cc0000;">
CRACK GEOMETRY IN PIPELINE WALL
(Cross-section through pipe wall)

External Surface (Outside)
+--------------------------------------------------+
|                                                  |
|                  Pipe Wall                        |
|                                                  |
|      Surface Crack:                Embedded Crack: |
|      +----------------+           +-------------+ |
|      |                |           |             | |
|      |  ██████████████ |           |   ██████   | |
|      |  ██████████████ |           |   ██████   | |
|      |  ██████████████ |           |   ██████   | |
|      |  ██████████████ |           |   ██████   | |
|      +----------------+           +-------------+ |
|                                                  |
+--------------------------------------------------+
Internal Surface (Inside)
</pre>
For better organization, wrap each diagram in its own <pre> tag with a heading as shown above.
